
Nikon D70s, Fully Manual, f 5, ISO 800, Shutter 1/250
Pop Up Flash -1.0 Intensity
Post Production Photoshop CS4
Location Redcar Skate park
This shot shows a controlled use of both high shutter speeds and good framing, I have taken this shot during a visit to a local skate park, for this shot I positioned myself on top of one of the several jumps and have a wide angle lens on to ensure that I capture the environment as well as the BMX and rider, I have chosen to include the graffiti in the background as I feel this adds to the shot, it allows the viewer to get a sense of the environment and adds another dimension to the image, the post production involved within further developing this image included adapting a pre set gradient to alter the colour and effect, I have used the preset gradient of black fading out to what already exists in the image, I have adapted this gradient by changing the gradient colour from black to green as it emphasises the graffiti and again makes the image more visually appealing in comparison to its original dull grey high contrast colour. Another alteration I have made in Photoshop was to select the magic lasso tool and select the body and bike to enable me to control the brightness, contrast, hue and saturation meaning that I was able to make the rider and his bike look like it is coming towards the viewer adding to the depth we can already see via the backdrop being so bright and alarming. By selecting the rider I was able to create the effect I was looking for which was to brighten the main subject here by using a combination of the above 4 adjustments i could alter when working on this individual piece.
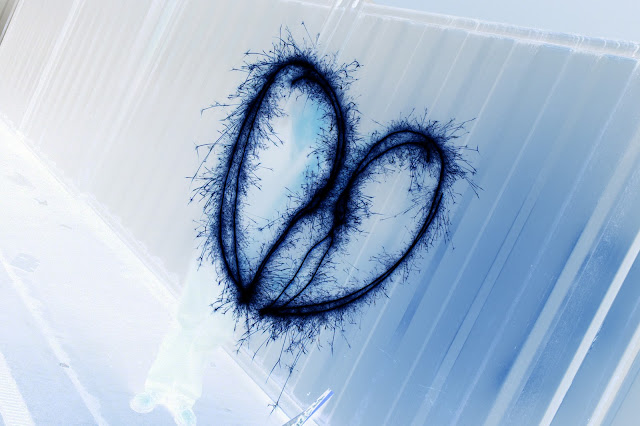
the above image has been constructed using the pre and post production stages of photography, after deciding what i wanted to photograph i then began to plan how and where to take the image, after getting the intended result of a broken heart formed by sparklers i then began to with take the post production stages, firstly i created a duplicate layer and developed my own personalised gradient, after doing so i create the overlay affect so that the white to blue would fall across or on top of the image to create the subsequent above image, see below images to understand how to develop a personaisied gradient and what to overlay it onto the intended image / subject.

this image above is another example of the use of a long exposure and the effectiveness it can have to create an extraordinary outcome, the image is of a flashing very small led light however over the duration of a 5 second exposure by walking towards the camera you are able to create some very cool and unique effects, i like this image as although it was unintentionally done the person holding the light has made a circular movement generating a cool effect, with further post production editing i feel this image could be improved by placing someones head in the distance within the small hole, the image looks 3d and this appeals to me as it is an example of a currently incomplete piece of work yet effective at getting people to have a second glance.
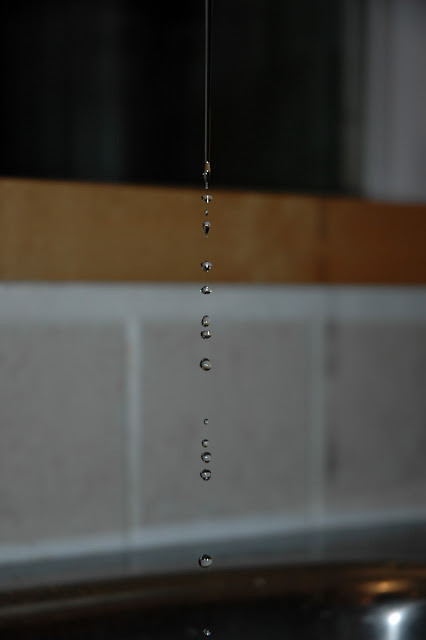
the above image is an example of my highest speed photography in practice, after watching some high shutter speed videos i felt ready to create my own series of images an the above example is one of a series of 7 images showing the water falling from a tap, the image i feel is a good representation of what high speed photography should document as the focal point is in focus whilst the mid and backgrounds appears to be one big blur. For this image I have used the manual focus function on my camera, the reason for this is because without the manual focus the main subject in this image, the water droplets would not be in focus and the background would be what the camera chooses to focus on, the reason for this is because the camera is only able to see the background when focusing as this is the only constant subject in the image as the water droplets were falling at a faster pace than the camera was able to recognize them, using the manual focus mode for this and the other water images on my blog has allowed me to focus on the independent droplets as appose to the background by placing a object for example a pen to focus on the area that the water will drop.

with this particular image or example i have tried to use the motion blur affect both during the shoot and via the post production, i have shot the image myself holding one hand out in front of the lens, whilst moving my hand in a fast movement towards the right i have tried to keep up with this by moving the camera at the same pace, you can see that my hand, watch and the product is in focus whilst the background can not be recognised by most viewers, because i have shot the image at around 60th of one second it has given me time to move my hand however still keep the camera handheld without gaining any upwards or downwards movements that could have ruined the image, the effect is easy to create is photoshop however for this particular example i mainly used the image straight from the camera to show how easy it is to create such easy yet intriguing effects.
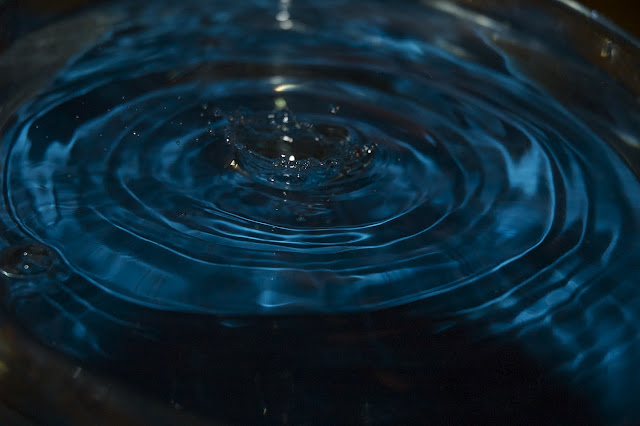
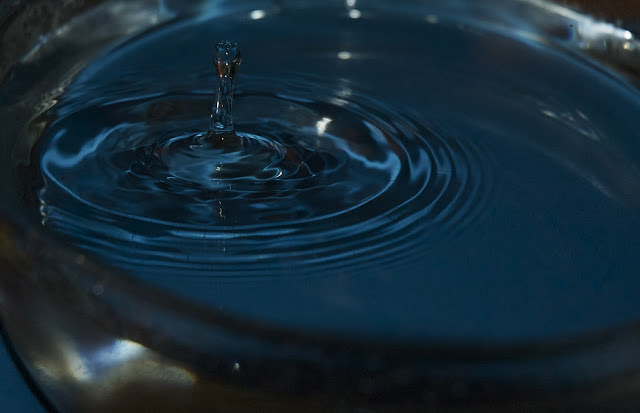
above are tow shots from my experimentation of fast shutter speeds, after seeing similar photos to this on the web i decided to develop my own, for this shot i had my camera on a tripod and positioned a large bowl on top of a blue piece of card, the images shown above are good example of fast shutter speed shots as they capture the splash and crowing of the water very well, no advanced post production was necessary however i did crop elements of the photo out make it seem as if the experiment wasn't conducted in my kitchen.
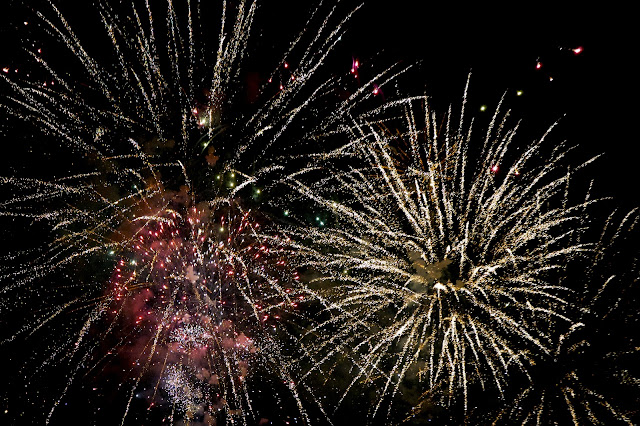
this is another example of faster shutter speeds combined with a low F stop number for this i used f 3.5 at around 500th of a second, i choose not to use a faster shutter as i wished to achieve what we can see above the explosion beginning to fall back down, instead of capturing the little lines i chose to use the settings to capture an image that has used a fast shutter but not so fast that you can not understand the movement that was involved if you were present, in addition the shutter speed was also at 500th as i needed the correct amount of light to get the appropriate exposure and didn't want to use a on camera flash or puss the ISO so high that digital noise would appear.
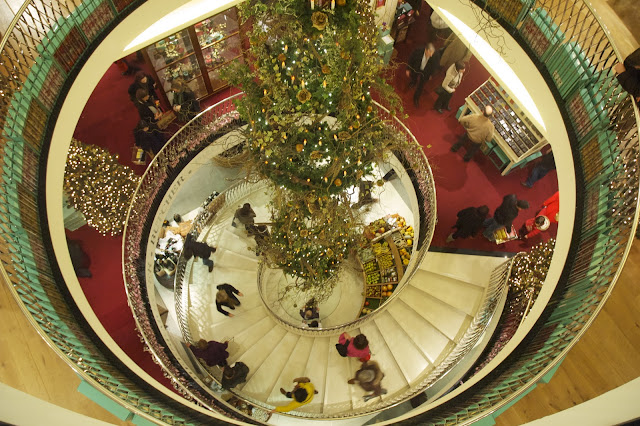
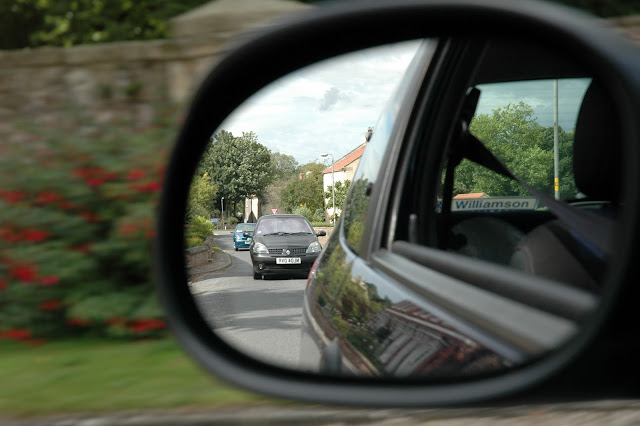
i have chosen to include the above two images on my blog as it demonstrates my inspiration for new ideas and perspectives for photographs, these two images show uniqueness and appeal to me as i haven't seen them done before, the first image if of fortnum and mason in london and shows the spiral staircase as a if it were a snails shell or other circular object, the second image is of two cars behind the one i am a passenger within this image also appears to me as within the mirror reflection the cars are perfectly still and in focus meanwhile the content away from the mirror appears blurred and so suggest or highest the important of my friends behind in their cars.
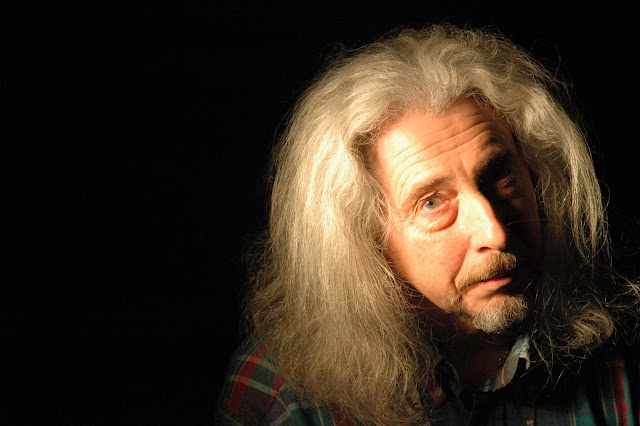
this is an example of the rembrandt lighting affect, this lighting affect is very popular and so i decided to attempt to produce my own image using the recommended settings from my photography teacher, i have chosen to light the near side of the face and have positioned the model towards the right hand side to suggest that he is trapped and he only has darkness ahead of him, i have however chosen to light my subjects clothing as i feel it shows their personality and approach to life in a meaningful way.
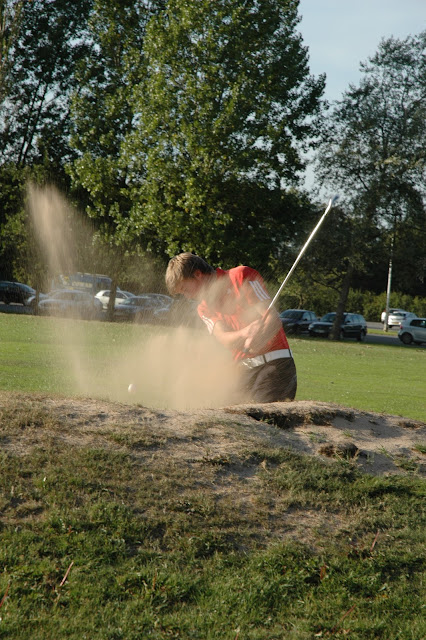
this is another example of high speed photography, i have used my Nikon D70s and have used the full manual mode to allow me to get the intended exposure whilst freezing the action, i have chosen to use F3.5 to allow as much light as possible onto the sensor and also to allow me to shoot at the fastest possible frame rate, the shutter speed was set to around 800th of a second and so frozen the sand, ball and golfers position to all for a action shot, the shot shows good framing and highlights the importance of fast shutter speeds .
Photoshop CS4 Tutorials
in this section of my blog are a number of photoshop tutorials i have followed to create some cool effects for images and even some backgrounds that i have made from scratch
http://www.youtube.com/watch?v=WrPS7JcSKzc
below are the two results i got from following this tutorial from the above link, i have followed the tutorial for the majority of the time but have also added some personal adjustments.


the above image has been constructed using the pre and post production stages of photography, after deciding what i wanted to photograph i then began to plan how and where to take the image, after getting the intended result of a broken heart formed by sparklers i then began to with take the post production stages, firstly i created a duplicate layer and developed my own personalised gradient, after doing so i create the overlay affect so that the white to blue would fall across or on top of the image to create the subsequent above image, see below images to understand how to develop a personaisied gradient and what to overlay it onto the intended image / subject.

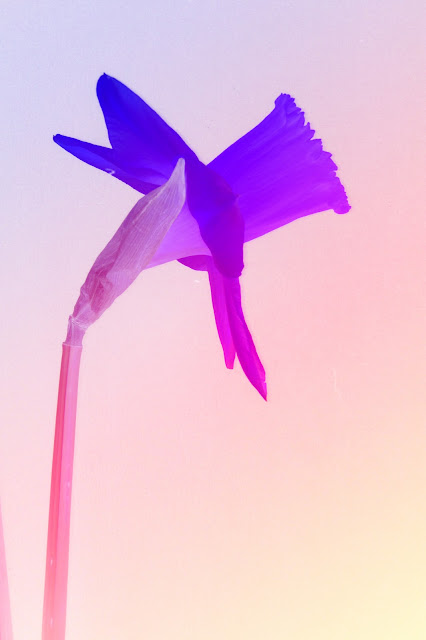
the above image has been achieved by using some easy and quick post production phases to help create the purple gradient effect, check the tutorial video i have created below to watch how a similar picture has been edited very quickly in a similar way, for this image i had positioned a flower in a vase and had left it in a well lit rom for several days, after monitoring the flower on a daily basis i kept track of its progress of life and waited for the point in which it could not grow any more, the shot was taken in dark conditions with a long exposure and high f stop, this was done so that i was able to get a great depth of field so that the cracks could be seen within the flowers stem, after taking this shot i did some quick editing to make this image more appealing and unique before uploading and sharing this sample of my work.

this image above is another example of the use of a long exposure and the effectiveness it can have to create an extraordinary outcome, the image is of a flashing very small led light however over the duration of a 5 second exposure by walking towards the camera you are able to create some very cool and unique effects, i like this image as although it was unintentionally done the person holding the light has made a circular movement generating a cool effect, with further post production editing i feel this image could be improved by placing someones head in the distance within the small hole, the image looks 3d and this appeals to me as it is an example of a currently incomplete piece of work yet effective at getting people to have a second glance.

the above image is an example of my highest speed photography in practice, after watching some high shutter speed videos i felt ready to create my own series of images an the above example is one of a series of 7 images showing the water falling from a tap, the image i feel is a good representation of what high speed photography should document as the focal point is in focus whilst the mid and backgrounds appears to be one big blur. For this image I have used the manual focus function on my camera, the reason for this is because without the manual focus the main subject in this image, the water droplets would not be in focus and the background would be what the camera chooses to focus on, the reason for this is because the camera is only able to see the background when focusing as this is the only constant subject in the image as the water droplets were falling at a faster pace than the camera was able to recognize them, using the manual focus mode for this and the other water images on my blog has allowed me to focus on the independent droplets as appose to the background by placing a object for example a pen to focus on the area that the water will drop.

with this particular image or example i have tried to use the motion blur affect both during the shoot and via the post production, i have shot the image myself holding one hand out in front of the lens, whilst moving my hand in a fast movement towards the right i have tried to keep up with this by moving the camera at the same pace, you can see that my hand, watch and the product is in focus whilst the background can not be recognised by most viewers, because i have shot the image at around 60th of one second it has given me time to move my hand however still keep the camera handheld without gaining any upwards or downwards movements that could have ruined the image, the effect is easy to create is photoshop however for this particular example i mainly used the image straight from the camera to show how easy it is to create such easy yet intriguing effects.


above are tow shots from my experimentation of fast shutter speeds, after seeing similar photos to this on the web i decided to develop my own, for this shot i had my camera on a tripod and positioned a large bowl on top of a blue piece of card, the images shown above are good example of fast shutter speed shots as they capture the splash and crowing of the water very well, no advanced post production was necessary however i did crop elements of the photo out make it seem as if the experiment wasn't conducted in my kitchen.

this is another example of faster shutter speeds combined with a low F stop number for this i used f 3.5 at around 500th of a second, i choose not to use a faster shutter as i wished to achieve what we can see above the explosion beginning to fall back down, instead of capturing the little lines i chose to use the settings to capture an image that has used a fast shutter but not so fast that you can not understand the movement that was involved if you were present, in addition the shutter speed was also at 500th as i needed the correct amount of light to get the appropriate exposure and didn't want to use a on camera flash or puss the ISO so high that digital noise would appear.


i have chosen to include the above two images on my blog as it demonstrates my inspiration for new ideas and perspectives for photographs, these two images show uniqueness and appeal to me as i haven't seen them done before, the first image if of fortnum and mason in london and shows the spiral staircase as a if it were a snails shell or other circular object, the second image is of two cars behind the one i am a passenger within this image also appears to me as within the mirror reflection the cars are perfectly still and in focus meanwhile the content away from the mirror appears blurred and so suggest or highest the important of my friends behind in their cars.

this is an example of the rembrandt lighting affect, this lighting affect is very popular and so i decided to attempt to produce my own image using the recommended settings from my photography teacher, i have chosen to light the near side of the face and have positioned the model towards the right hand side to suggest that he is trapped and he only has darkness ahead of him, i have however chosen to light my subjects clothing as i feel it shows their personality and approach to life in a meaningful way.

this is another example of high speed photography, i have used my Nikon D70s and have used the full manual mode to allow me to get the intended exposure whilst freezing the action, i have chosen to use F3.5 to allow as much light as possible onto the sensor and also to allow me to shoot at the fastest possible frame rate, the shutter speed was set to around 800th of a second and so frozen the sand, ball and golfers position to all for a action shot, the shot shows good framing and highlights the importance of fast shutter speeds .
Photoshop CS4 Tutorials
in this section of my blog are a number of photoshop tutorials i have followed to create some cool effects for images and even some backgrounds that i have made from scratch
http://www.youtube.com/watch?v=WrPS7JcSKzc
below are the two results i got from following this tutorial from the above link, i have followed the tutorial for the majority of the time but have also added some personal adjustments.


http://designertoday.com/Tutorials/Photoshop/6178/Ray.of.Light.Photoshop.CS4.Tutorial.aspx
this link will take you to a written tutorial showing how to create a ray of light in your images, my example has been posted below and i have followed this guide completely to create a similar effect for my image.

http://blogs.oreilly.com/missingmanuals/blog/2008/12/five_fast_photo_effects_in_pho.html
the above tutorial demonstrates how to quickly replace a background in an image, my subsequent finished product is shown below.

No comments:
Post a Comment